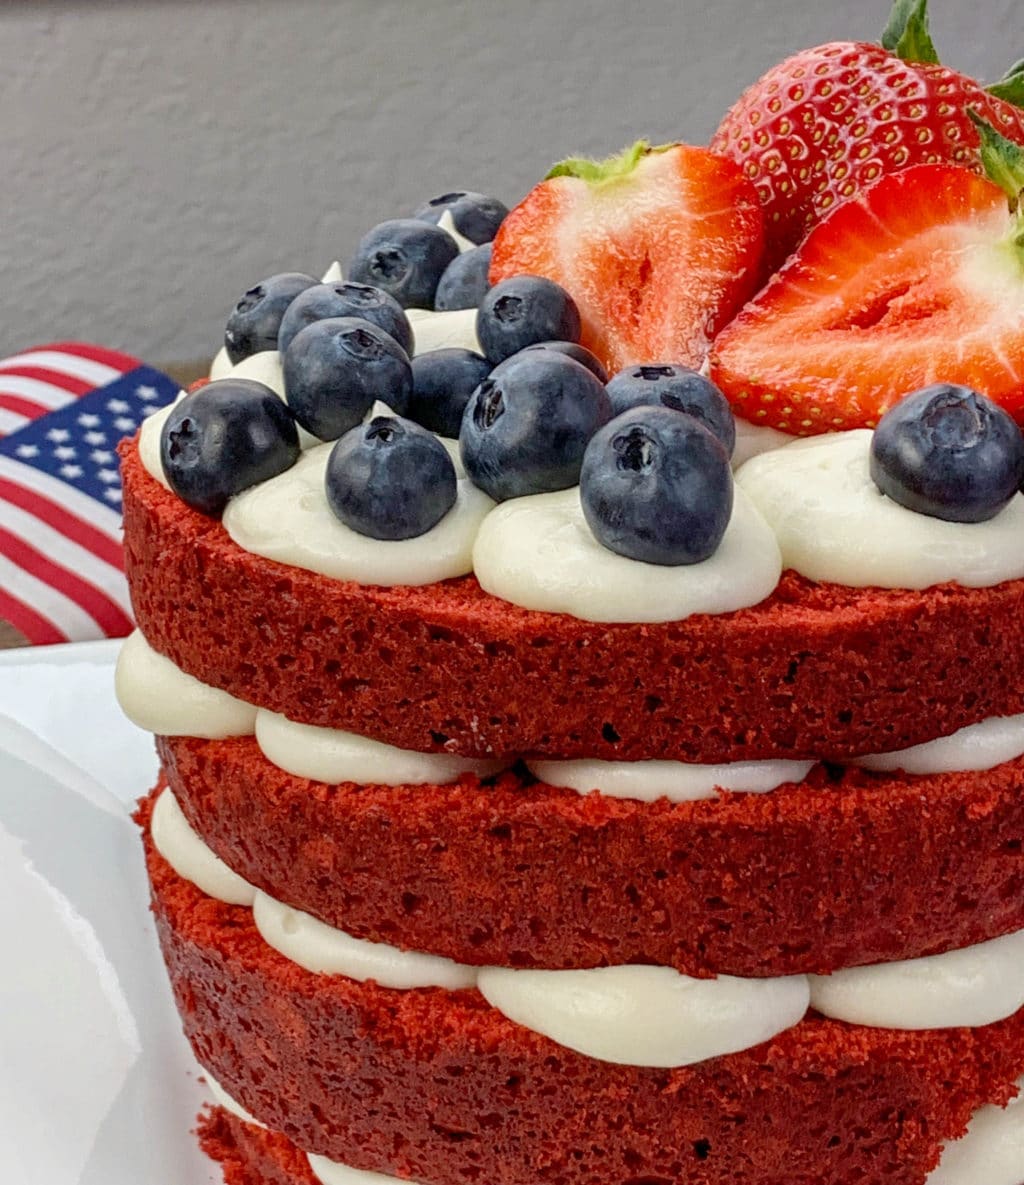
This Patriotic Red Velvet Cake is perfect for Memorial Day, July 4th or any other patriotic holiday. And it tastes as good as it looks! We added some of our cream cheese frosting along with some fresh strawberries and blueberries for the Red, White and Blue look.

What is Cake Flour
Cake flour is different than all-purpose flour as it has a much lower protein level. Cakes made with cake flour will have a finer, more tender crumb than those made with all-purpose flour. That being said, in most cases it is possible to substitute cake flour with all-purpose flour unless the cake is extremely tender (ex. angel food cake).
Cake Flour Substitute
To use all-purpose flour for 1 cup of cake flour measure out 1 cup all-purpose flour, remove 2 tablespoons of the all-purpose flour and replace it with 2 tablespoons of cornstarch. Whisk together before using.
For this recipe, we decided to make the red velvet cake from scratch. If you are in a hurry or just plain lazy, you can substitute that part by making one from a box. This will not affect the final look of this patriotic cake. Props to @livewellbakeoften for the red velvet cake recipe!

One of my wife’s favorite holidays growing up was the 4th of July. Her family did a big block party and it was almost always about the food. Growing up you don’t always understand or appreciate the effort that goes into something like that.
Tips
- While you can pretty much use any brand of cream cheese, I highly recommend you use Philadelphia brand cream cheese. You will taste the difference.

As adults, we love food, we socialize around food and in this day and age, it’s always about the presentation. This cake can be for a birthday, holiday party or a family BBQ, this recipe is super easy to make and doesn’t require a lot of “decorating skills”.
The bottom line is if you’re heading to a Memorial Day party, a 4th of July or just want to show your patriotism this summer, this is the cake for you. This cake is fluffy and tastes yummy with a hint of cocoa flavor.

Buttermilk Substitution
If you don’t have Buttermilk on hand, you can use this trick as a substitute: Add one tablespoon of lemon juice to a measuring cup. Add milk and fill to the 1 cup measurement line. Stir the mixture together and let sit for 5 minutes. Since this recipe calls for 1 1/3 cup you will need to adjust accordingly.
Another option is to use a cultured buttermilk blend. All you need to do is add water. I was very skeptical at first but in a pinch, it works great!


Gather your Ingredients
You will need the following ingredients to make this Patriotic Red Velvet Cake recipe. For ingredient amounts please refer to the printable recipe card at the bottom of this post.
- Cake Flour
- Cocoa Powder
- Baking Soda
- Salt – a must for most recipes
- Unsalted Butter – you can use regular salted butter if you prefer
- Granulated Sugar
- Eggs – fresh large eggs as much as possible
- Vegetable Oil – you can also use canola oil or olive oil
- Red Food Coloring
- Vanilla Extract – you can use store-bought or my Instant Pot Homemade Vanilla Extract or my Sous Vide Vanilla Extract
- White Vinegar – regular distilled white vinegar only
- Buttermilk – if needed you can make your own using milk and lemon juice
- Cream Cheese Frosting
- Strawberries
- Fresh Blueberries
How to Make Patriotic Red Velvet Cake
- Preheat oven to 350°F. Spray two 9-inch cake pans well with nonstick cooking spray, line the bottoms of the pans with parchment paper, and set aside.
- In a large mixing bowl, whisk together the cake flour, cocoa powder, baking soda, and salt. Sift the dry ingredients to remove any lumps of cocoa powder. Set aside.
- In a large mixing bowl, cream together the butter and sugar on medium speed for 4 to 5 minutes. Add the eggs and beat until fully combined. Once fully combined, add the oil, red food coloring, vanilla extract, and vinegar and mix until well combined
- Add the dry ingredients alternating with the buttermilk, starting and ending with the dry ingredients and mix. DO NOT OVERMIX THE BATTER.
- Pour the batter evenly between the two prepared cake pans. Tap the pans on the counter 2-3 times to remove any air bubbles from the cake batter.

- Bake for 28 to 32 minutes or until a toothpick inserted into the center of the cake comes out clean. Carefully remove from the oven and place on a wire rack. Let the cake cool in the pans for 15-20 minutes. Carefully remove the cakes from the cake pans and place them on the wire rack to cool completely.

- Once the cakes are completely cooled, use a serrated knife to cut each cake in half horizontally. This will give you 4 cake layers.
- Pipe the cream cheese frosting between each layer to create a 4 layer cake. Frost the top of the cake using your favorite piping tips. Decorate with fresh strawberries and blueberries to your taste.


If you are looking for more festive cake recipes, make sure you check out my White Cake with Cookie Butter filling. Yummy!


Patriotic Red Velvet Cake
↑ Click stars to rate
Ingredients
- 2 ⅔ Cups Cake Flour
- ¼ Cup Unsweetened Cocoa Powder
- 1 Tsp Baking Soda
- ½ Tsp Salt
- ½ Cup Unsalted Butter, room temperature
- 1 ¾ Cups White Sugar
- 2 Large Eggs, room temperature
- ½ cup Vegetable Oil
- 1 oz Red Food Coloring
- 2 Tsp Vanilla Extract
- 1 Tsp White Vinegar
- 1 ⅓ Cups Buttermilk, room temperature
- Cream Cheese Frosting
- 3 Large Fresh Strawberries, Sliced
- ½ Cup Fresh Blueberries
Tap the Button to open ChatGPT with a substitution request ready to submit.
Instructions
- Preheat oven to 350°F. Spray two 9-inch cake pans well with nonstick cooking spray, line the bottoms of the pans with parchment paper, and set aside.
- In a large mixing bowl, whisk together the cake flour, cocoa powder, baking soda, and salt. Then sift the dry ingredients to remove any lumps of cocoa powder. Set aside.
- In a large mixing bowl , cream together the butter and sugar on medium speed for 4-5 minutes. Add the eggs and mix until fully combined. Add the oil, red food coloring, vanilla extract, and vinegar. Mix until well combined
- Add the dry ingredients alternating with the buttermilk, starting and ending with the dry ingredients. Mix until just combine. DO NOT OVER MIX THE BATTER.
- Poor the batter evenly between the two prepared cake pans. Tap the pans on the counter 2-3 times to remove any air bubbles from the cake batter.
- Bake for 28 to 32 minutes or until a toothpick inserted into the center of the cakes comes out clean. Carefully remove from the oven and place on a wire rack. Let the cake to cool in the pans for 15-20 minutes. Carefully remove the cakes from the cake pans and place on the wire rack to cool completely.
- Once cakes are completely cooled, use a serrated knife to cut each cake in half horizontally. This will give you 4 cake layers.
- Pipe the cream cheese frosting between each layer to create a 4 layer cake. Frost the top of the cake using your favorite piping tips. Decorate with fresh strawberries and blueberries to your taste.
Notes


I love baking, so decided to try this recipe. It was delicious and moist. The cream cheese made it very flavourful.